Monday 30 March 2015

Stashbusting a lobster tail

Lobster-tail bustle cage that is.  (If you're not sure what garment I'm talking about, here's one in the collection of the Metropolitan Museum of Art)

I got it cut out & started sewing it yesterday, using the Laughing Moon pattern #112 view D.  I can't resist being economical with fabric even when I don't have to - got it out in 1.5m of 112cm (45") wide fabric. I made some changes to the construction. I flat felled the cage seams - no manky fraying inside my underpinnings.  Plus the top 2 & 3 steels now cross each other, mainly cos the extant ones I've coveted seem to have that and I want it.


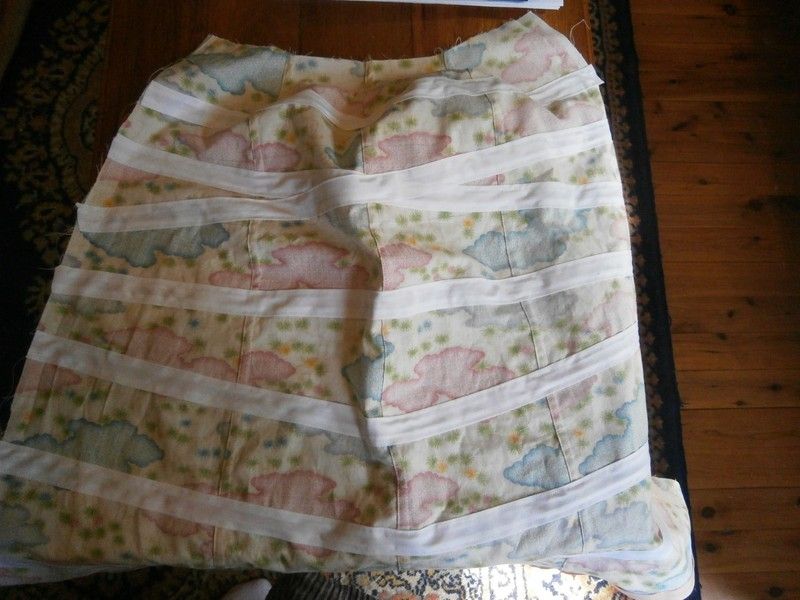
Also I will have the bottom inside panel button closed, not lace up. Second lastly (maybe) the seam joining the cage & front drape will all be on the inside of the cage, and bound with bias tape.  Maybe last change, the edge of the front drape will also have bias binding around it - the pattern instructions are to turn the edge under 1.5cm and stitch it down - despite the fact that it's only 0.5cm  longer than the seam it abuts and that you've.just.already.sewn.it.to!!! WHAT!


Oh, not my last change, I'm not leaving a gap in bottom of the channels to insert the steels, but popping them in the seam that I'll then stitch close.  Easier!

Probably my last change is to add a pleat to the the lower edge, stitching it just above the lowest steel. But I haven't cut and pleated athat yet.  I'd have got the steels in already but I didn't take them for my stay in the mountains (keeping a friend company after a breakup).
Here's some flowers at her local train station.


Wednesday 25 March 2015

My copy typing sample

Here's what I was waffling about, without most symbols typed out, and no illustration!


It my not seem like much, but it helped me get my head around what was printed in the original instructions.

I did cut out the pieces tonight, and handling each piece also helped me understand what they might be like to assemble.

Tuesday 24 March 2015

Task completed: copy typing 1913 dress' sewing instructions

Last night's contribution to Mrs Whitlow was looking at the minimal original instructions, which are a reproduction of the slightly damaged pattern envelope and going wha????

They're a small pitch font, very abbreviated and densly packed. I've used similar ones from vintage mail order patterns, but the difference is I know how the 40s or 50s garment does up and goes onto the body. These are even more abbreviated, assuming that you already know how to assemble the style of garment, and only cover the design features, such as to crease & stitch the bodice front pleats before stitching the shoulder seam. If you're using the regulation waist use these pattern piece markings, if using raised waistline use the other pattern markings.

I thought that typing them out might help me better understand them - and it worked to help me focus. Larger pitch, not so crowded made my eyes less likely to flicker madly around at all the other densly packed information.

The envelope is damaged so you can see that there's an item 12, but not what that is. Part of my brain knows that once I'm handling the pieces that I'll understand how it works. I had a quick look in Nancy Bradfield's Costume in Detail - to see other teens garments and sketches of their openings. I'll also look in my Janet Arnold Patterns of Fashion to see if there's a similar dress. I think not but worth a squizz.

I do have a couple of sewing books from that era, not sure if one of them is general or specific. One's definitely outerwear.

From the directions, it seems that both the bodice and skirt get attached to a waist belt (or stay), so I think I'll be buying some grossgrain ribbon for that. Time to check my oldest garment sewing books.

Monday 23 March 2015

From left field - a Downton Abbey inspired housekeeper's dress

The weekend after Easter, I'm going to Nullus Anxietas V - the 5th aussie Discworld convention. I went to #3 back in 2011, though I was quite unwell - not contagious but an autoimmune flare up. So I spent most of that sleeping on padded bench seating in the venue lobby.

Back then I threw together a very dodgy Mrs Whitlow costume. She's the stout, much widowed housekeeper of Unseen University in Ankh-Morpork.She's described as wearing black, a creaking corset and an obvious red wig. Also adding "H" to words in her belief of behaving properly. I had a black skirt, black shirt and red wig - the best that I could do given how frequent the flareups were back then.

However I'm planning to make a new version - of course I'm on the crazy train and it's not the costume I should be devoting my time to. But, hey, sometimes we have to take sewing inspiration when it strikes and use that creative mojo to go on to fuel the other projects.

I had a choice of pattterns - because although most screen adaptations are pseudo-late victorian that's not where I'm going for Mrs W. I have a 1913/4 dress pattern, and also a teens blouse and teens skirt that I could combine. While fossicking through my collection of historical patterns I knew as soon as I had Past Patterns 6053 in my grabby hands again, that I have to use it. I'm going to make a narrow belt, and hang my waist chatelaine hook of it, with a large key. Will try to find more old keys and have a bunch! I may still use the collar and cuffs from my Wearing History teens blouse (Elsie).


Here's my Past Patterns dress


Of course I'm more than willing to acknowledge that I'm heavily influenced by Downton Abbey - though I've only seen a half dozen episodes from the first season. (I know, need to play catch up one of these months or risk having my obsessive costumer badge revoked). I'll use my Truly Victorian 1903 corset - in black. Not quite the right cut but I'll make it work.

Oh, better check my wig box for Mrs Whitlow's wig too.

Monday 9 March 2015

My floral dress has gremlins

I was hoping to have a photo of me wearing the dress today, however instead I came close to stomping on it from outrage.

I've never made so many mistakes in a garment since I started sewing 40 years ago. For once I took a single project to the sewing guild - usually I take a couple or three so I have a chance to switch projects if something is hinky or needs thinking about. This time I thought "Focus - take just the dress and finish it".

Ahem, that didn't go so well. First up I realised that I'd left the shirt pattern at home. The shirt you wonder, cos yes I'm using a different sleeve pattern piece, from my multi-use shirt pattern and hadn't cut that out yet. Without the pattern piece I was never going to get close to finishing the dress on Saturday. But I thought "Gird your loins, battle on and get all but the sleeves done. You can do it."

Except I didn't.

I let out the skirt front panel seams so that they would get closer to fitting the waist band, but they were still a good 1.5cm too narrow on each side. So I figured that I'd simply cut the waistband off at an angle. More ab I'm going to make it fit no matter what, rather than using finesse. Then when overlocking the waistband seams before I could top stitch them, I caught the other end of the seam in the overlocker and had a heartstopping moment when I thought I'd cut into more than the seam allowance. Thankfully not, but it's the zipper seam so I'm trying to decide if the reduced bulk is a good thing or if it's simply too close to the seam. (photos another time).

I then pinned the side seam together only to find the bodice seams didn't match up. The front was 2cm (3/4inch) shorter than the back. 1/8th inch or 3mm I could happily fudge, but not 2cm!

It felt like my brain had melted & dribbled out my ears (perhaps) as I checked I wasn't imagining it. Investigating it turns out that I'd sewn the bust dart 2cm larger on that side. How or why I have no idea, but this is the point the urge to stomp and/or burn it came upon me. I packed that sucker up and decided I'd tackle it another day.

It's not just lost it's [new project] mojo, it's a disaster zone that I'm not wanting to wear the minute its done.